 Since my trip to New York City 5 years ago, I LOVE window displays, and have wanted to do my own. I now have two small street level display windows at my studio, so I'm excited to make things interesting! Here's my first crack at it:
I had painted the whole window box white when I repainted the rest of the studio to give it a fresh feel. However, the white can be glaring when the sun hits it, so I decided to go for a sohpisticated wood flooring look. In order to do this, I stained garden stakes ebony and cut off the ends . . . it took 100 stakes to cover the
 bottoms of both display windows!
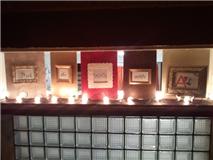
The first picture shows 5 "wallpaper" panels (actually just gift wrap stuck to foamcore with spray adhesive), each with a framed word that collectively reads"Deck the Walls with Art." The large bulbs reference Christmas, but give the window a sense of theatricality and stage presence.
The next picture is a scan of my initial sketch -- I was going to hang strips of ribbon in the background, but found that the panels took up plenty of visual space, and are blocking natural

light in the studio. I will save the ribbons for later.
The third photo is my favorite part of the window display, although the photo doesn't do it justice. It is the middle of the second window (after the google Maps app barcode and magnets display), showcasing my Christmas cards. I am glad I have this mini pedastal to create some height and interest.
The next picture was an in-progress photo (you can see the white floor), but is the best photo of the Wordle I used to reiterate the theme. (What's a wordle? See the last post.) I framed it, used a mini wooden easel, and stuck the back of my business card to the

glass for a personal touch. I now have a sign in between the frame and my sticker that has business hours.
The final photo is the very first panoramic I've taken with my camera phone. As you can see, the displays really "glow" at night.
Overall, I wanted to showcase the season, and identify artwork as an awesome gift, but didn't want to be cliche with seasonal decorations. I hope it stands out!


